Let's See How They Improved By Using Our Products
Learn how our customers increase their leads and revenue through personalization and many other features. Check their stories!
Basic Tutorial - How to Import and Add New Contacts
When sending email marketing, of course the most important thing is to have an email contact that will be sent. Certainly get it in a legal way by collecting it yourself and not as a result of purchasing an email contact list, because it is strictly prohibited. Why? Read here.
In this article, you will learn about adding contacts. There are two ways you can use.
Click Contact book menu (you can enter to the menu via dashboard or on the left-side bar). Then click on dropdown button, select “Contact Book” menu.
After you manage to enter Add Contact, you have to fill First Name, Last Name, Email Address and select label for the contact. Then click Add Contact to save the contact.
Any contacts you add manually, you can set it to use double opt-in or not. When the double opt-in feature is enabled, the contact you enter will be pending. The status will change until the contact confirms emails automatically sent by the system.
Flow
Contact Book menu → Add Contact → Fill First Name, Last Name, Email Address and Label → Add Contact → contact successfully saved.
On Contact Book, you can fill more data for one contact. Here are the field:
Email address of your subscriber. This field is required when you adding new contact, even you adding it manually or via import.
First name of your subscriber. Besides email address, this field is also required when you adding new contact, even you adding it manually or via import.
Last name of your subscriber. This field is optional, and last name can make your email to be more personal.
Gender of your subscriber. Field gender consists of Male, Female and Other.
Birthday date of your subscriber. If you adding a new contact manually, you are able to add it directly on this field. But, if you are importing contact from other, you can fill the birthdate with (DD/MM/YYYY) format.
Phone number of your subscriber. You are able to fill this field with numeric format, for example: 081234567890.
The name of company of your subscriber. This field is able to be filled with numeric, alphabetic or mixed of them both.
The country where your subscriber located. This field is able to be filled with alphabetic.
The city where your subscriber located. This field is able to be filled with alphabetic.
Internal note for your subscriber. This field is free to be filled with text format.
In doing contact import, you have to get into Contact Book menu (You go into the menu via the dashboard or the side bar on the left). Then click the dropdown button that located right next to Add Contact button and select Import.
There will be three steps for the import contact process:
Step 1, File Preparation
In this step you need to prepare the contact file that you want to import. Here are 2 things you should look of your import file:
Contact file must be in .csv format (Recommended). If on Windows OS you can select CSV (Comma Delimited), for MacOS you can select CSV (Comma Separated Value).
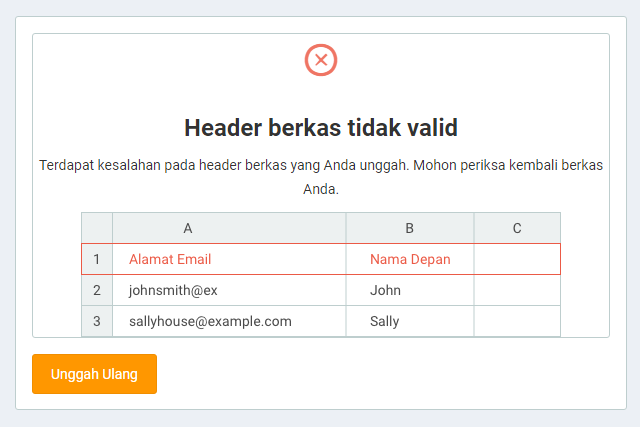
Note : Our system does not support with file format (.csv) from Google Contact. If you still use .csv, a box will appear like this when you upload it
If you have a .csv file format from Google Contact, it is recommended to adjust the placement according to the sample that you can see by downloading the file below.
The format of writing contact data inside the file starts at least with the column “emailaddress” → column “firstname” (You can download the sample file we have attached)
Make sure your contact has fulfilled with all the terms and condition. If you don’t fulfilled the terms and condition. your contacts can not be imported into the system.
Download our sample import file if you are still having trouble to import contacts.
**Important to know**
The maximum size of the .csv file format is 5mb with a maximum of 20,000 contacts, and for file formats. xls, the maximum file size is 2MB with a maximum content of 10 thousand contacts.
Step 2, Upload File
In this step you can drag and drop the files you want to import or click to browse the files.
Click check file to proceed to the next step.
Step 3, Specify label and import options
Here you will select the labels and import options you want. There are 3 import options:
Step 4, Match the Field
In this step you will match the fields. There are 3 things you need to know at this stage:
Click the “Import File” button when appropriate.
After the contact import process has been completed, the results of the import contacts will appear. Such as how many new contacts, updated contacts, total contacts, invalid contacts and duplicated cash.
Flow
Contact Book menu → click the drop down button → Click “Import Contact” → Choose File (the format is appropriate and the order of the data columns is correct) → Select Import Mode → Label → Adjust Field → Import file → import contact results.
If you want to see your contact’s import history, you can click the “Import History” button. There you will see the status of the results of your contact import as shown below.
