Let's See How They Improved By Using Our Products
Learn how our customers increase their leads and revenue through personalization and many other features. Check their stories!
All About Create Flow
Here you will learn about a selection of nodes that you can use as commands for your Flow. This node is the command that you will choose in the form of Trigger, Filter or Action. Here are some explanations:
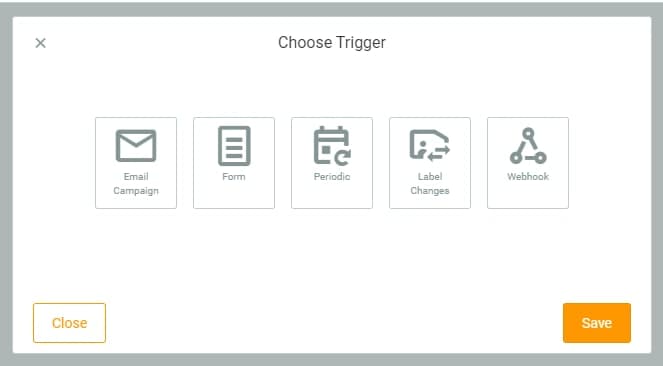
Campaign Email Here you can only select emails that have been sent or have ‘Finish’ status. So all the data reports that have been recorded in the Report Email, will be a reference for how the Flow will run. So we recommend waiting for Report Email to collect its data for at least 3-7 days. This is because when the email has the status of ‘Finish’, there is still the possibility that some recipients have not been recorded in the email report. If you start campaign Flow when the data report is not complete, the recipients that have not been recorded will not be included in the data flow.
Forms You can automate each incoming data to be able to proceed to the command you want.
Periodic You can schedule monthly or yearly later according to the command you want to use. So make sure your contact has a field of type ‘Date’ and the date has been filled in. For example, sending annual emails for Birthday Emails, adding labels every month to certain contacts at the end of the month and so on.
There are 3 settings you need to know here.
Contact Update This trigger works based on the presence of activity on the label in your contacts. Suppose you have a label ‘Read only’, then any addition or deletion to that label will trigger this trigger.
Webhooks This trigger works to receive any data sent via Webhook. So later every incoming data will be directly integrated into Campaign Flow using the provided Webhook. For more details, we have discussed here for the Webhook guide.

This filter is only available if you are using Trigger Email, Form, or Webhook. The purpose of the filter is to re-select the incoming data to match the criteria you want.
Email Filters There are 2 options here. You can filter emails by:
In addition you also need to prepare for ‘Waiting Time’. This is to give a timeout to the user, who has not performed the appropriate action on filtering. Suppose you send an email to 2 people. One has done things according to filtering, while the other email recipient has not taken any action. So, this ‘Waiting Time’ will wait according to the selected time, before it will be categorized into a ‘No’ scenario if it exceeds the ‘Waiting Time’.
If referring to the scenarios ‘Yes’ and ‘No’. Then the ‘Yes’ scenario will be positioned on the selected filter. Whereas in the ‘No’ scenario, you need
Filters Forms Specifically for Form Filters, you can only select Form data if you use the ‘Multiple Choice’ or ‘Checkbox’ component. This means that later from several answers that have been made, you can specify which answer you want to scenario.
Webhook Filters You can use this filter to provide criteria for data that will be passed to the next node. For more details, you can read the Webhook guide here.
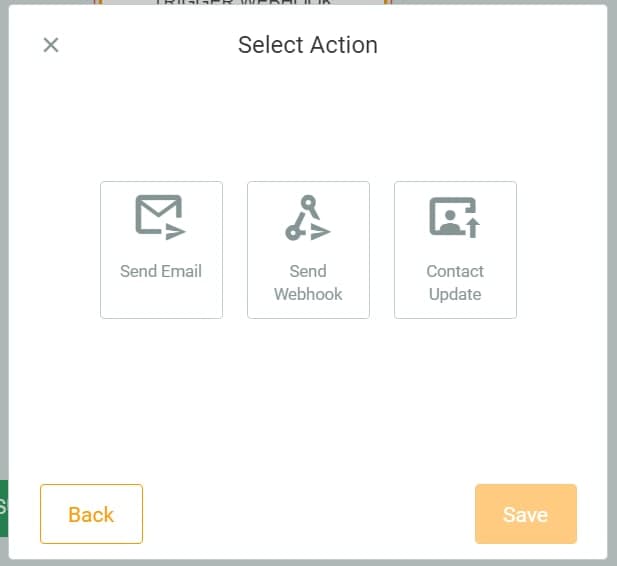
Action Send Email This command is to send an email to the user according to the scenario. Unlike Trigger Email, Action Send Email uses Transactional Email quota. So make sure if you want to use this Action, first validate the domain you are using for Email Transactional.
Action Change Label This command is to add or remove the selected label.
Action Send Webhook A command to send data using the Webhook that you have, with Extra Data if you want to add additional data.
There are 2 options you can do to delete Node,
Be careful, if you want to delete a node in the middle or top position while there are lots of nodes below it, the node below it will also be deleted. If you’ve already created too many Nodes, and want to replace the Node in the middle, it’s a good idea to use ‘Replace With’ on the Node you want to delete, to temporarily overwrite it with the Node below it. Later you simply create a new node again above the node you just overwritten.